A Quick Introduction to the Panel Library
- Tom Duff
td@plan9.bell-labs.com
1 Introduction
The panel library hides much of the dirty work involved in making simple user interfaces for interactive applications on Plan 9. The design is modeled strongly on Ousterhout's Tcl/Tk, except that the programming language is C and most of Tcl/Tk's automatic behind-the-scenes recalculation and redrawing is missing.
The library provides facilities to create user-interface panel elements such as push-buttons, text entry windows, sliders, etc., to re-initialize existing elements, to calculate layout automatically, to display panels in a bitmap, and to process mouse and keyboard events.
The library defines a Panel data type that describes the structural, geometric, and operational behavior of user-interface elements. When displayed in a bitmap, a panel corresponds to a rectangular area, usually with some identifying graphics like a frame or a label drawn on it. Panels are organized into trees, with each panel's children drawn on top of it and inside its rectangle. None of the children's rectangles overlap, so the whole structure is like a nest of boxes.
2 A Simple Example
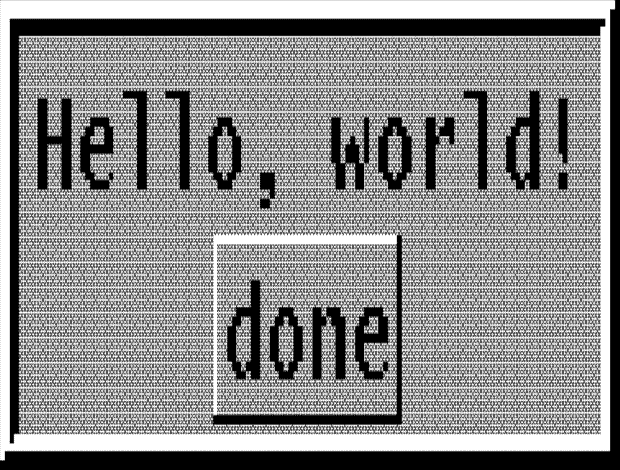
Here is a simple example that displays a panel containing a label and a done button and processes mouse events until the user hits done.
#include <u.h>

#include <libc.h>

#include <libg.h>

#include <panel.h>

Panel *root;

void done(Panel *p, int buttons){

	USED(p, buttons);

	exits(0);

}
void main(void){

	binit(0, 0, 0);

	einit(Emouse);

	plinit(screen.ldepth);


	root=plframe(0, 0);

	pllabel(root, 0, "Hello, world!");

	plbutton(root, 0, "done", done);


	ereshaped(screen.r);

	for(;;) plmouse(root, emouse());

}
void ereshaped(Rectangle r){

	screen.r=r;

	plpack(root, r);

	bitblt(&screen, r.min, &screen, r, Zero);

	pldraw(root, &screen);

}
The next three lines create a tree of panels. The root panel draws a frame around its children. Calling plgroup here instead of plframe would omit the frame. The children are a Hello, world! label and a button that calls the done routine when hit. The difference between pllabel and plbutton is that labels are not mouse-sensitive. The display reflects this by drawing the button in relief and changing its appearance when a mouse button is depressed over it.
Next, a call to ereshaped initializes the screen, and a simple loop sends mouse events to the root panel for processing.
The call to
plpack
in
ereshaped
calculates the geometry of the tree of
panels, and
pldraw
displays the tree.
Here's what the display looks like:
3 Display Layout
When plpack lays out a panel tree, it calculates a rectangle for each panel node, inside which the node's graphics and children are drawn. The layout of a node's children is controlled by flags given when the node is created. The first two arguments of every panel-creating function are a pointer to the parent panel and the flags used by plpack.
Plpack is declared thus:
int plpack(Panel *root, Rectangle space);
Plpack starts off with an empty rectangular frame, and fills it with children in eldest-to-youngest order. Placing each child uses up part of the frame and leaves a subrectangle of available space. For each child, it slices enough space to hold it from one of the four sides of the available space. Flag values PACKN, PACKE, PACKS, and PACKW determine which side the space is taken from. This figure illustrates the process:
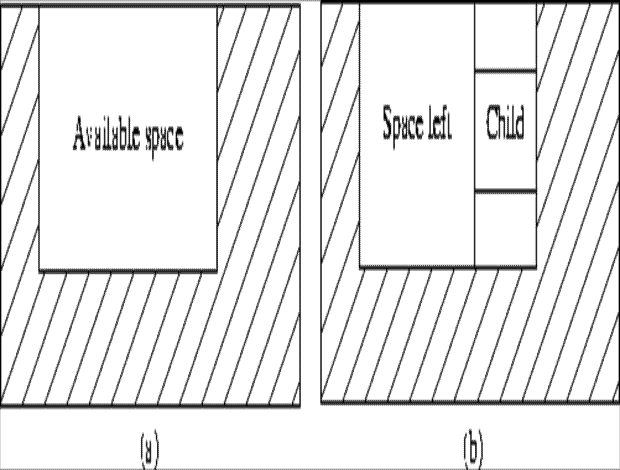
Figure (a) shows the available space in a frame before packing

a child whose flag is

PACKE.
Figure (b) shows the child in place and indicates the space available

for packing the next child.
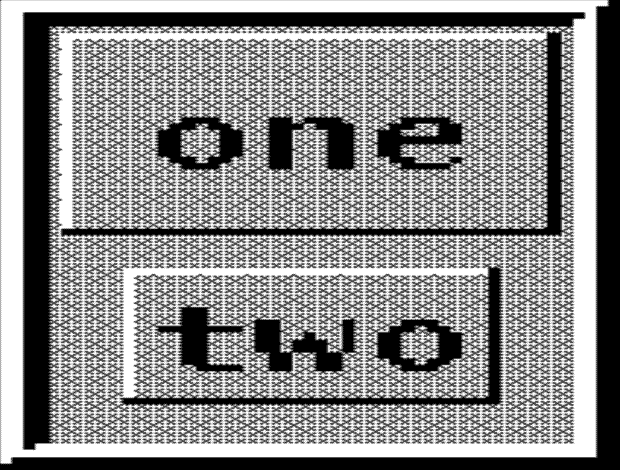
For example, 4 buttons packed below one another, like this,
root=plgroup(0, 0);

plbutton(root, PACKN, "one", 0);

plbutton(root, PACKN, "two", 0);

plbutton(root, PACKN, "three", 0);

plbutton(root, PACKN, "four", 0);
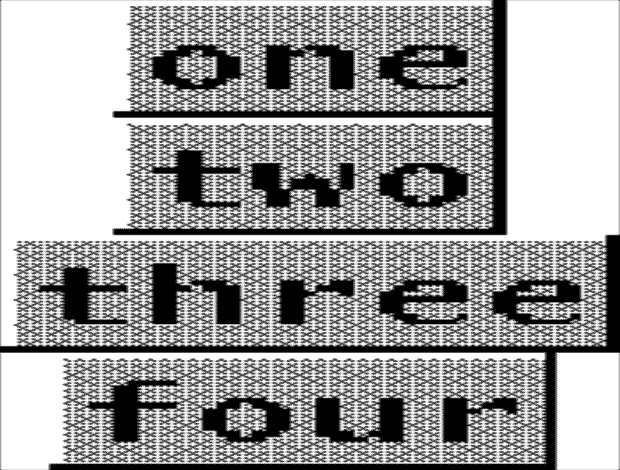
Since the buttons are different sizes, the result looks ragged. The frame is wide enough to accommodate the widest button, and the parts sliced off for the four buttons are all the same size, but the buttons don't use all the space that plpack makes available to them. The FILLX flag expands a node in the x direction to fill any extra space sliced off for it. Here's the previous example, cleaned up:
root=plgroup(0, 0);

plbutton(root, PACKN|FILLX, "one", 0);

plbutton(root, PACKN|FILLX, "two", 0);

plbutton(root, PACKN|FILLX, "three", 0);

plbutton(root, PACKN|FILLX, "four", 0);
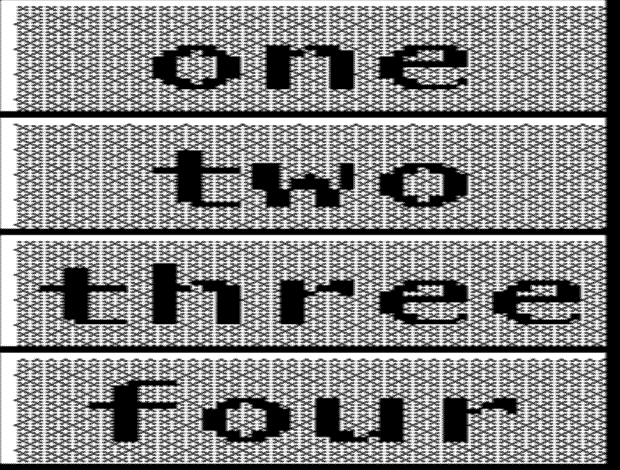
Similarly, FILLY expands in the y direction.
There may be some freedom in the placement of panels that do not use FILLX and FILLY. There are flags to place a panel at any of eight compass points of the space reserved for it, or at the center, called PLACEN, PLACENE, PLACEE, PLACESE, PLACES, PLACESW, PLACEW, PLACENW, and PLACECEN. Here's an example:
root=plgroup(0,0);

plbutton(root, PACKN, "placement", 0);

plbutton(root, PACKN|PLACEE, "east", 0);

plbutton(root, PACKN|PLACEW, "west", 0);

plbutton(root, PACKN|PLACEN, "north", 0);
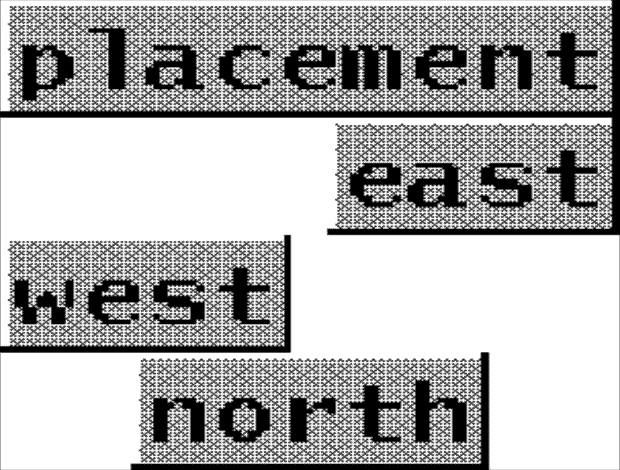
Of course, flagging the last button PLACES or PLACECEN produces the same result, since it has no surplus space in the north-south direction.
Normally, plpack fits everything into the smallest possible space. There are four ways to make things larger. First, the FIXED flag tells plpack that it should look in the panel's fixedsize field (a Point) to find the panel's dimensions. This is useful, for example, to make space for an image of known size. (FIXED is actually the OR of two flags, FIXEDX and FIXEDY, that individually fix the width and height of the panel.)
Second, a margin around a panel can be specified by setting its pad field (again, a Point) to a non-zero value. Similarly, a panel can be given extra space by setting its ipad field. The difference between the two is that pad asks for extra space outside the panel, where ipad asks for extra space inside. Both pad and ipad are added to the space requested for the Panel from its parent, but only ipad is added to the space actually given to the Panelso they both represent increments on the total size of the requested rectangle, not margins around all four borders. Here's an example:
Panel *b;

root=plframe(0,0);

b=plbutton(root, PACKN, "one", 0);

b->ipad=Pt(10,10);

b=plbutton(root, PACKN, "two", 0);

b->pad=Pt(10,10);
Third, setting the EXPAND flag causes plpack to give the panel whatever unused space the parent may have. If multiple children of the same parent all set EXPAND, the unused space is distributed equitably among them. Here is a text editor panel, with a scroll bar to the left and a label on top. Pledit, described later, creates a window of editable text that uses up all the space left over after placing the label and scroll bar.
root=plframe(0, EXPAND);

pllabel(root, PACKN|FILLX, "edit text");

plscrollbar(root, PACKW|FILLY);

pledit(root, PACKN|EXPAND, Pt(0,0),

	L"How now, brown cow?", 19, 0);
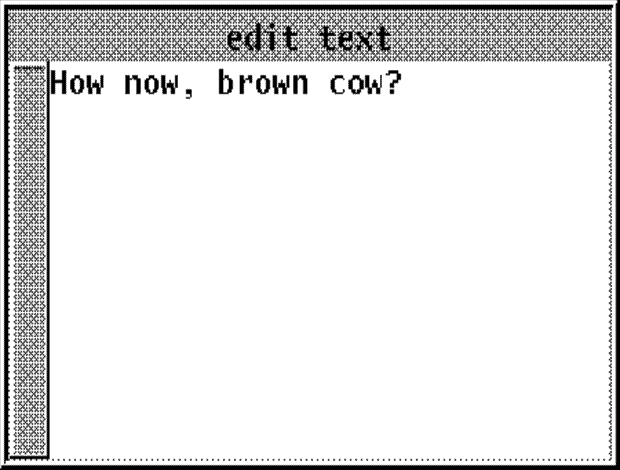
Note that the EXPAND flag must be supplied to both the root panel and the text window. The root expands to fill the space passed in as plpack's second argument. Without it, the text window would expand to fill the root, but the root would remain as small as possible.
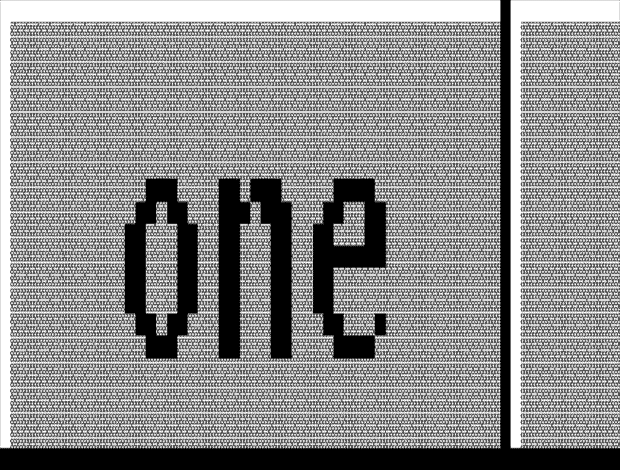
Fourth, the MAXX and MAXY flags set the panel's width or height equal to the largest of its siblings. MAXX evens up the widths of a horizontal array of buttons, like this:
root=plgroup(0, 0);

plbutton(root, PACKW|MAXX, "one", 0);

plbutton(root, PACKW|MAXX, "two", 0);

plbutton(root, PACKW|MAXX, "three", 0);

plbutton(root, PACKW|MAXX, "four", 0);
This is the resulting display:
Specifying 0 for the flags is equivalent to using
PACKN|PLACECEN,
which seems like a reasonable default.
4 The Public Parts of a
PanelThe Panel structure has a lot of fields that are just for the use of the library. Here are the fields that applications can use with impunity.
typedef struct Panel Panel;

struct Panel{

	Point ipad, pad; /* internal and external padding */

	Point fixedsize; /* size of FIXED panels */

	int user;        /* available for application use */

	void *userp;     /* available for application use */

	Rectangle r;     /* filled in by pack */

	...              /* more private fields follow */

};
Plpack stores a panel's coordinates in Rectangle r.
Plpack should be called whenever changes occur that can be expected to affect the panel's layout. In particular, it should normally be called when a panel tree is initially created and in ereshaped. Usually plpack should be called on the root of a panel tree. It is possible to call plpack on a subtree of a panel tree that has already been packed, for example when the subtree has been updated and the program wishes for those changes not to affect the rest of the display. In that case, plpack's Rectangle argument should be the current size of the subtree to be repacked.
5 Panel-wrangling Functions
int plinit(int ldepth);
void pldraw(Panel *p, Bitmap *b);
Because a panel's children are drawn nested inside it, programs can update parts of the display by calling pldraw on subtrees of a panel tree. For example, after calling plinitlabel (described below) to change the text of a label, it can be redisplayed by calling pldraw on the label, leaving the rest of the display alone.
void plmove(Panel *p, Point min);
void plfree(Panel *p);
6 Event Handling
void plmouse(Panel *recipient, Mouse m);

void plgrabkb(Panel *p);

void plkeyboard(Rune c);
Keyboard events are sent to a designated panel. The keyboard focus is changed by calling plgrabkb. Keyboard events are sent to the appropriate panel by calling plkeyboard, whose argument is the Rune received from the keyboard.
Here's a generic skeleton of a simple panel library application that uses both mouse and keyboard input:
#include <u.h>

#include <libc.h>

#include <libg.h>

#include <panel.h>

Panel *root;

Panel *mkpanels(void);

void eventloop(void);
void main(void){

	binit(0, 0, 0);

	einit(Emouse|Ekeyboard);

	plinit(screen.ldepth);


	root=mkpanels();


	ereshaped(screen.r);


	eventloop();

}
void eventloop(void){

	Event e;

	for(;;){

		switch(event(&e)){

		case Ekeyboard:

			plkeyboard(e.kbdc);

			break;

		case Emouse:

			plmouse(root, e.mouse);

			break;

		}

	}

}
void ereshaped(Rectangle r){

	screen.r=r;

	plpack(root, r);

	bitblt(&screen, r.min, &screen, r, Zero);

	pldraw(root, &screen);

}
The missing mkpanels function is the user's code to create the application's panel tree. The main function does all the necessary library initialization, calls mkpanel and ereshaped to create and display the panel tree, and calls eventloop, which gets keyboard and mouse events and passes them to plkeyboard and plmouse. Packing and displaying the panel tree is handled by ereshaped.
7 Panel Types
The examples so far have used a half-dozen panel types: plframe, plgroup, plbutton, pllabel, plscrollbar, and pledit, but those don't nearly exhaust the possibilities. A reminder: in the following descriptions, the first two arguments of every panel-creation function are a pointer to the new panel's parent (0 if there is none) and the flags that guide plpack. The new panel's parent must have been created by calling one of plgroup, plframe, or plpopup; otherwise the creation function will fail and return zero.
8 Buttons
Panel *plbutton(Panel *parent, int flags,

	Icon *label, void (*hit)(Panel *, int));
Panel *plcheckbutton(Panel *parent, int flags,

	Icon *label, void (*hit)(Panel *, int, int));
Panel *plradiobutton(Panel *parent, int flags,

	Icon *label, void (*hit)(Panel *, int, int));
void plsetbutton(Panel *panel, int value);
Panel *plmenu(Panel *parent, int flags, Icon **items,

	int itemflags, void (*hit)(int, int));
Here, Icon* is a synonym for void*. The actual argument may be a char* or a Bitmap*, in which case the BITMAP bit must be set in the flags word.
Plcheckbutton and plradiobutton create push-buttons that, when drawn, contain a check-box that may be marked or not. Pushing the button flips the check mark on or off. In addition, when a radio button turns on, it turns off all its radio button siblings, so at most one radio button in a group can be on at any instant. (They're called radio buttons because they imitate the buttons on a car radio.) The function plsetbutton allows the state of the check-box to be initialized. By default it is 0 (off).
The state of the check mark is available to the hit routine in the check field of the button. The hit function's first argument points to the button. The second argument is the mouse buttons. The third argument reflects the state of the check. When a radio button turns off one of its siblings, the sibling's hit function is not called.
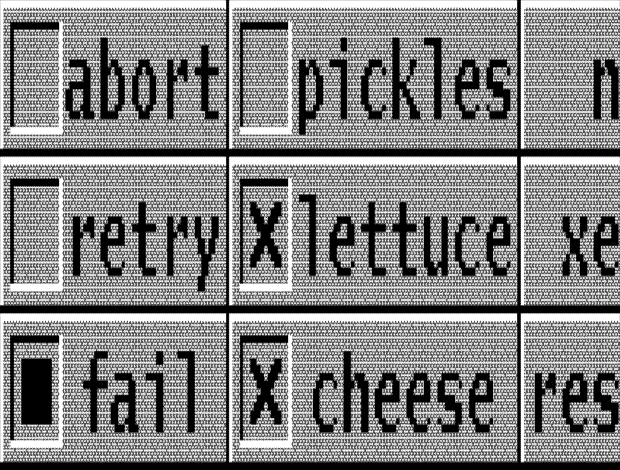
The plmenu function creates a group (see below) containing an array of buttons. The items argument is an array of Icon pointers, ending with a zero pointer, that gives the label of each button. The itemflags button indicates the flags to be used when creating each button. Whenever a menu button is hit, the hit function is called with the mouse buttons as first argument and the panel's index in the items array as second argument. Here's code that makes a radio button list, a check list, and a menu:
Panel *g, *p;

char  *buttons[4];

root=plgroup(0,0);

g=plgroup(root, PACKW);

plradiobutton(g, PACKN|FILLX, "abort", 0);

plradiobutton(g, PACKN|FILLX, "retry", 0);

p=plradiobutton(g, PACKN|FILLX, "fail", 0);

plsetbutton(p, 1);

g=plgroup(root, PACKW);

plcheckbutton(g, PACKN|FILLX, "pickles", 0);

p=plcheckbutton(g, PACKN|FILLX, "lettuce", 0);

plsetbutton(p, 1);

p=plcheckbutton(g, PACKN|FILLX, "cheese", 0);

plsetbutton(p, 1);

buttons[0]="new";

buttons[1]="xerox";

buttons[2]="reshape";

buttons[3]=0;

plmenu(root, PACKW, buttons, PACKN|FILLX, 0);
9 Labels and Message boxes
Panel *pllabel(Panel *parent, int flags, Icon *label);
Panel *plmessage(Panel *parent, int flags, int width,

	char *text);
root=plframe(0, 0);

pllabel(root, PACKN|FILLX, "The 10th Amendment");

plmessage(root, PACKN, 280,

	"The powers not delegated to the "

	"United States by the Constitution, "

	"nor prohibited by it to the States, "

	"are reserved to the States respectively, "

	"or to the people.");

10 Grouping
Panel *plgroup(Panel *parent, int flags)
Panel *plframe(Panel *parent, int flags)
Most of the examples above use plgroup or plframe, so we won't include another here.
11 Canvas
Panel *plcanvas(Panel *parent, int flags,

	void (*draw)(Panel *), void (*hit)(Panel *, Mouse *));
12 Sliders
Panel *plslider(Panel *parent, int flags, Point size,

	void (*hit)(Panel *p, int but, int val, int len))

void plsetslider(Panel *p, int val, int range)
A slider's position can be set by calling plsetslider, whose arguments are a pointer to the slider, what to set its position to, and the maximum value that the val argument is assumed to take. The value will be rescaled to the slider's actual size.
Here's an example that makes a compound panel containing a slider and a couple of labels, one of which is updated by the slider's hit function to reflect the slider's value:
Panel *sliderlabel;

char sliderval[8]=" 57/100";

void hit(Panel *p, int buttons, int val, int range){

	USED(p, buttons);

	sprint(sliderval, "%3d/100", val*100/range);

	plinitlabel(sliderlabel, PACKE, sliderval);

	pldraw(sliderlabel, &screen);

}

void slider(void){

	Panel *sl;

	root=plframe(0, 0);

	pllabel(root, PACKN|PLACEE, "test value");

	sl=plslider(root, PACKW|FILLY, Pt(137, 0), hit);

	plsetslider(sl, 57, 100);

	sliderlabel=pllabel(root, PACKE, sliderval);

}
The hit function calls plinitlabel and pldraw to reinitialize and redisplay sliderlabel, making the label track the slider's value. Panel reinitialization functions such as plinitlabel are discussed in more detail below.
Note also that the slider's size is given as Pt(0,137); the FILLY flag makes it come out the same height as the label next to it.
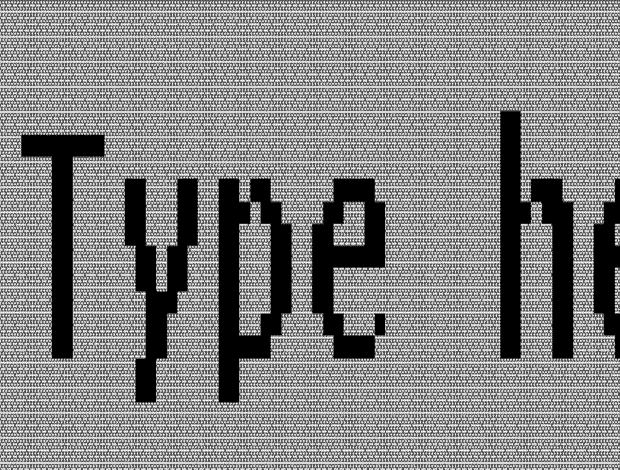
13 Text entry
Panel *plentry(Panel *parent, int flags, int width,

	char *init, void (*hit)(Panel *p, char *text))

char *plentryval(Panel *);
Here's code for an example:
root=plgroup(0,0);

pllabel(root, PACKW, "Type here: ");

plentry(root, PACKW, 140, "/dev/null", 0);
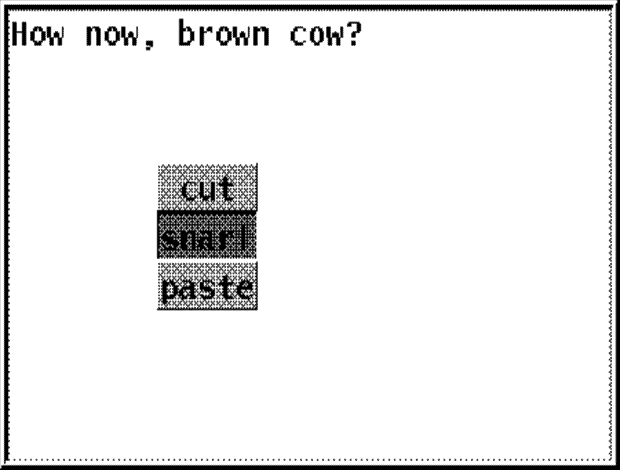
14 Pop-up panels
Panel *plpopup(Panel *parent, int flags,

	Panel *but1, Panel *but2, Panel *but3);
Here's an example, a text editor window with a couple of pop-up menus. Pressing button 2 will pop up the cut/snarf/paste menu. Pressing button 3 will pop up the read/write/exit menu. Pressing button 1 doesn't pop up a menu the mouse events pass through the plpopup to its child, the pledit panel.
char *menu2[]={

	"cut",

	"snarf",

	"paste",

	0

};

char *menu3[]={

	"read",

	"write",

	"exit",

	0

};

void popup(void){

	Panel *m2, *m3, *pop;

	m2=plmenu(0, 0, menu2, PACKN|FILLX, 0);

	m3=plmenu(0, 0, menu3, PACKN|FILLX, 0);

	root=plframe(0, EXPAND);

	pop=plpopup(root, EXPAND, 0, m2, m3);

	pledit(pop, EXPAND, Pt(0,0),

		L"How now, brown cow?", 19, 0);

}
15 Pull-down panels and menu bars
Panel *plpulldown(Panel *parent, int flags,

	Icon *label, Panel *pull, int side);

Panel *plmenubar(Panel *parent, int flags, int itemflags,

	Icon *label1, Panel *pull1, Icon *label2, ...);
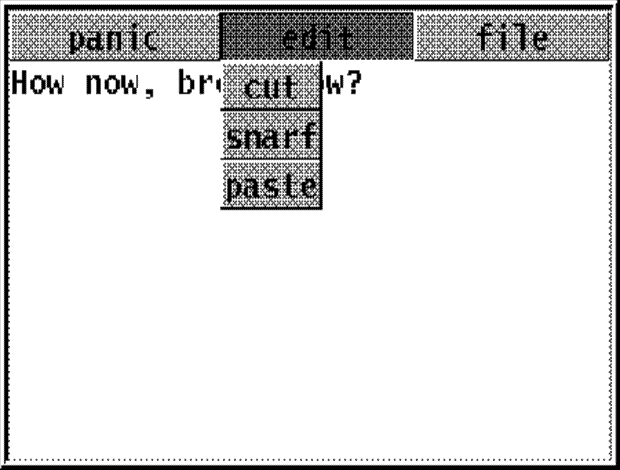
Here's an edit window with a menu bar at the top:
char *menu1[]={

	"abort",

	"retry",

	"fail",

	0

};

void mbar(void){

	Panel *m1, *m2, *m3;

	m1=plmenu(0, 0, menu1, PACKN|FILLX, 0);

	m2=plmenu(0, 0, menu2, PACKN|FILLX, 0);

	m3=plmenu(0, 0, menu3, PACKN|FILLX, 0);

	root=plframe(0, EXPAND);

	plmenubar(root, PACKN|FILLX, PACKW|EXPAND,

		"panic", m1, "edit", m2, "file", m3, 0);

	pledit(root, EXPAND, Pt(0,0),

		L"How now, brown cow?", 19, 0);

}
Here's the display, with one of the menus pulled down:
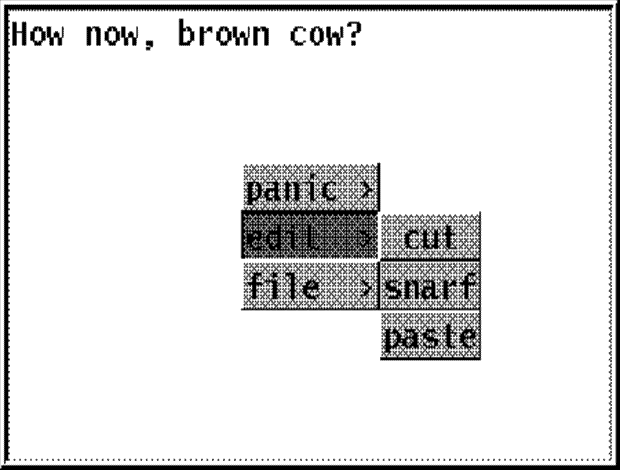
Here's code for a similar arrangement, but with the menu bar converted to a pop-up menu with the sub-menus cascaded to the right:
Panel *m1, *m2, *m3, *menu, *pop;

m1=plmenu(0, 0, menu1, PACKN|FILLX, 0);

m2=plmenu(0, 0, menu2, PACKN|FILLX, 0);

m3=plmenu(0, 0, menu3, PACKN|FILLX, 0);

menu=plgroup(0,0);

plpulldown(menu, PACKN|FILLX, "panic >", m1, PACKE);

plpulldown(menu, PACKN|FILLX, "edit  >", m2, PACKE);

plpulldown(menu, PACKN|FILLX, "file  >", m2, PACKE);

root=plframe(0, EXPAND);

pop=plpopup(root, EXPAND, 0, menu, 0);

pledit(pop, EXPAND, Pt(0,0),

	L"How now, brown cow?", 19, 0);
Here's the display, with the main menu popped up and
showing a sub-menu:
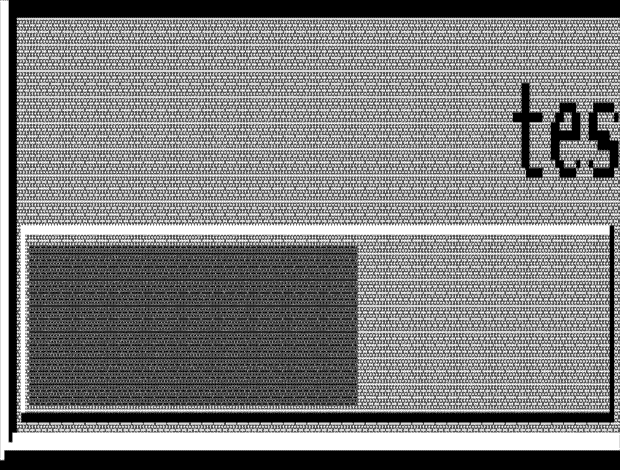
16 Scrollable lists and scroll bars
Panel *pllist(Panel *parent, int flags,

	char *(*generate)(int index), int nlist,

	void(*hit)(Panel *p, int buttons, int index));
Panel *plscrollbar(Panel *parent, int flags);

void plscroll(Panel *scrollee,

	Panel *xscroller, Panel *yscroller);
Here's code to create a list box with a scroll bar:
char *genlist(int which){

	static char buf[7];

	if(which<0 || 26<=which) return 0;

	sprint(buf, "item %c", which+'a');

	return buf;

}

void scroll(void){

	Panel *l, *s;

	root=plgroup(0, 0);

	l=pllist(root, PACKE, genlist, 8, 0);

	s=plscrollbar(root, PACKW|FILLY);

	plscroll(l, 0, s);

}

17 Editable text
Panel *pledit(Panel *parent, int flags, Point minsize,

	Rune *text, int ntext, void (*hit)(Panel *));
The pledit function creates a scrollable window of single-font text. Its arguments are:
- minsize
- the minimum acceptable size (in pixels) of the window.
- text
- an array of Runes (not chars) containing the window's initial contents.
- ntext
- the number of runes in text.
- hit
- Text in an edit window can be selected by sweeping with the mouse. After each selection, hit is called with a pointer to the panel as argument.
When a pledit window is the keyboard focus, typed-in characters mostly replace the current selection. The exceptions are backspace, which deletes the selection and the character before it (if any), ctrl-U, which deletes back to the beginning of the line on which the selection starts, and ctrl-W, which deletes back to the beginning of the word at which the selection starts.
There are a half-dozen functions that manipulate the text in a pledit window and its display.
- Rune *pleget(Panel *p);
- returns a pointer to the window's text. Note: this is not the same as the text pointer passed to pledit, which is only used to initialize an internal text buffer. The pointer returned by pleget is only good as long as the text remains unchanged. (That is, until the next character is typed, or plpaste is called.)
- int plelen(Panel *p);
- returns the length of the window's text.
- void plescroll(Panel *p, int top);
- The top argument is an index into the window's text. The window is scrolled so that the line containing the indexed Rune is at the top of the window.
- void plegetsel(Panel *p, int *sel0, int *sel1);
- stores the index of the first character of the selection in sel0 and the first beyond in sel1.
- void plesel(Panel *p, int sel0, int sel1);
- picks a new selection, updating the display correspondingly
- void plepaste(Panel *p, Rune *text, int ntext);
- removes the runes currently selected from the buffer, replacing them with the text pointed to by text, whose length is ntext.
The following example uses the panel library and the generic application skeleton given above to implement most of a simple cut-and-paste text editor. It lacks only facilities to read and write files.
Rune text[];

char *buttons[]={

	"cut",

	"paste",

	"snarf",

	"exit",

	0

};

Rune *snarfbuf=0;

int nsnarfbuf=0;

Panel *edit;

void hitmenu(int, int);

void snarf(void);
Panel *mkpanels(void){

	Panel *scrl, *pop, *menu, *root;

	root=plgroup(0, EXPAND);

	scrl=plscrollbar(root, PACKW);

	menu=plmenu(0, 0, buttons, FILLX, hitmenu);

	pop=plpopup(root, EXPAND, 0, menu, menu);

	edit=pledit(pop, EXPAND, Pt(0,0),

		text, sizeof(text)/sizeof(Rune)-1, 0);

	plscroll(edit, 0, scrl);

	plgrabkb(edit);

	return root;

}
void hitmenu(int button, int index){

	USED(button);

	switch(index){

	case 0:	/* cut */

		snarf();

		plepaste(edit, 0, 0);

		break;

	case 1:	/* paste */

		plepaste(edit, snarfbuf, nsnarfbuf);

		break;

	case 2:	/* snarf */

		snarf();

		break;

	case 3:	/* exit */

		exits(0);

	}

}
void snarf(void){

	int s0, s1;

	Rune *text;

	plegetsel(edit, &s0, &s1);

	if(s0==s1) return;

	text=pleget(edit);

	if(snarfbuf) free(snarfbuf);

	nsnarfbuf=s1-s0;

	snarfbuf=malloc(nsnarfbuf*sizeof(Rune));

	memmove(snarfbuf, text+s0, nsnarfbuf*sizeof(Rune));

}
The mkpanels function creates a display with a scroll bar and a pledit window, over which button 2 or button 3 pops up a four-entry menu. The hitmenu function processes menu commands. Snarf copies the current selection into snarfbuf, unless the selection is empty.
18 Formatted text
Panel *pltextview(Panel *parent, int flags, Point minsize,

	Rtext *text, void (*hit)(Panel *p, int buttons, Rtext *t));
- minsize
- the minimum acceptable size for the window. text points to a linked list of rtext structures (described below) describing text and illustrations, their spacing and layout, and indicating which segments are mouse-sensitive.
- hit
- the function called to register a mouse hit. Its arguments are the panel in which the hit occurred, which mouse buttons were pressed, and a pointer to the piece of text that was hit.
Each member of a list of Rtext structures describes either a Font and a string that will be displayed in a single call to string, or a Bitmap to be displayed by calling bitblt (see bitblt(2)). Here is (part of) the definition of Rtext:
typedef struct Rtext Rtext;

struct Rtext{

	int hot;     /* responds to hits? */

	void *user;  /* user data */

	int space;   /* how much space if no break */

	int indent;  /* how much space after a line break */

	Bitmap *b;   /* what to display, if b!=0 */

	Panel *p;    /* what do display, if p!=0 and b==0 */

	Font *font;  /* font in which to draw text */

	char *text;  /* what to display, if b==0 and p==0 */

	Rtext *next;

	...          /* more private fields follow */

};
- hot
- non-zero if this Rtext is mouse-sensitive.
- user
- a pointer not used by the panel library. It can be used in a hit function to interpret the mouse action.
- space
- how many pixels of space to leave between this Rtext and the previous one, if they're drawn on the same line.
- indent
- how many pixels to indent this Rtext by, if it's the first one on a line.
- b
- If b!=0 this Rtext is an illustration and b points to a bitmap containing it.
- p
- If b==0 and p!=0 this Rtext is an inline panel.
- text
- If b==0 and p==0 this Rtext must point a string displayable by a single call to string.
- font
- the font in which text should be displayed.
- next
- a pointer to the next Rtext in the list.
The following three functions create new Rtexts, returning pointers to the newly allocated storage:
Rtext *plrtstr(Rtext **head, int space, int indent,

	Font *f, char *s, int hot, void *user);
Rtext *plrtbitmap(Rtext **head, int space, int indent,

	Bitmap *b, int hot, void *user);
Rtext *plrtpanel(Rtext **head, int space, int indent,

	Panel *p, void *user);
These functions create new Rtext nodes of the three kinds. Plrtstr creates a string node with font f and text s, plrtbitmap creates a bitblt node with bitmap b, and plrtpanel creates a subpanel node with Panel p. Since plrtstr doesn't make a copy of the string s, be careful that its storage is not accidentally overwritten. The space, indent, hot, and user arguments are used to initialize the corresponding fields of the new Rtext. Since subpanel nodes are always mouse-sensitive, plrtpanel does not take a hot argument. Head is a pointer to a pointer to the first node of an Rtext list. Initialize *head=0 before making a new list. Plrtstr, plrtbitmap, and plrtpanel will update it appropriately.
The function
void plrtfree(Rtext *t);
Each Rtext node can be drawn in a single call to string, bitblt, or pldraw. Line breaks can occur between Rtext nodes. If an Rtext node is drawn at the beginning of a line, its indent field tells how far to indent it from the left margin. When an Rtext is drawn on the same line as its predecessor, its space field indicates how many pixels of space to leave between the two. If space is zero, there will never be a line break between the node and its predecessor, to allow for words with internal font changes.
Rtext *plgetpostextview(Panel *p);
void plsetpostextview(Panel *p, Rtext *top);
19 Panel Reinitialization
For each panel-creation function, there is a corresponding reinitialization function whose name is just the creation function with the initial letters pl changed to plinit. Its arguments are the same as the creation function's, except that the initial Panel pointer indicates the panel to be re-initialized, not its parent. For example, there is an plinitmessage corresponding to plmessage, that can be used to change the text displayed in a message panel.
The implementation has two shortcomings. First, for no good reason, plinitmenubar is missing. Second, you can't change the kind of a panel by calling a different plinit function on it.
20 Nothing is Automatic
When you use the panel library, nothing happens automatically. There are no daemons watching for changes in the state of panels to recompute their geometry or redisplay them. If you call plinitmessage to post a message to an error window, you must call pldraw to see the display. If you add a new panel to a tree, you must repack it and redisplay it yourself. If you call plmove you should also call pldraw to see the result.
21 Caveat Emptor
The Panel library is new software created to build the World-Wide Web browser mothra(1). It is too young to have been tried in many other programs, so it should probably be regarded as experimental.
Copyright © 1995 Lucent Technologies. All rights reserved.